
Are you ready to embark on your next robotics project? Look no further! At Any Component Lab (ACL), we offer high-quality 2-wheel and 4-wheel robot chassis kits that are perfect for hobbyists, students, and professionals alike.
In this blog post, we’ll dive into the features, advantages, and potential applications of both chassis types to help you decide which one is right for your project.
2-Wheel Robot Chassis
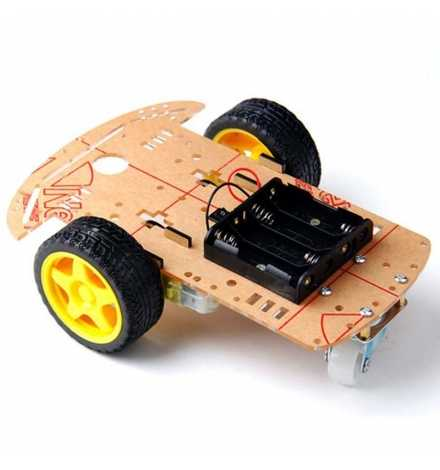
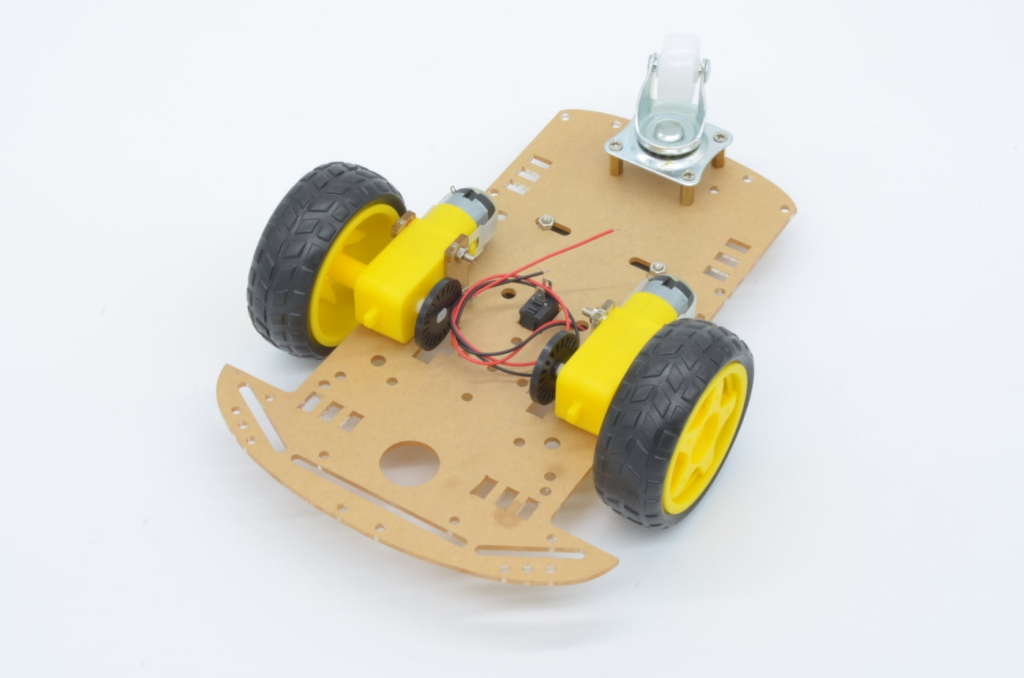
Our 2-wheel robot chassis is designed for simplicity and agility. It’s an excellent choice for beginners or for projects that require quick and precise movements. We’ll take a closer look at the components included in the kit and provide a step-by-step guide on how to assemble it. Here’s what you can expect:
Features
- Compact design: The 2-wheel chassis is compact and lightweight, making it easy to maneuver and perfect for indoor projects.
- Simple assembly: The kit comes with all necessary components, including wheels, motors, and a chassis frame, which can be easily assembled with basic tools.
- High maneuverability: With just two wheels, this chassis can make tight turns and navigate through narrow spaces with ease.
- Motor compatibility: It supports a variety of DC motors, allowing for customizable speed and torque.
Components
Our 2-wheel robot chassis kit comes with everything you need to build a functional robot base. Here are the main components included in the kit:
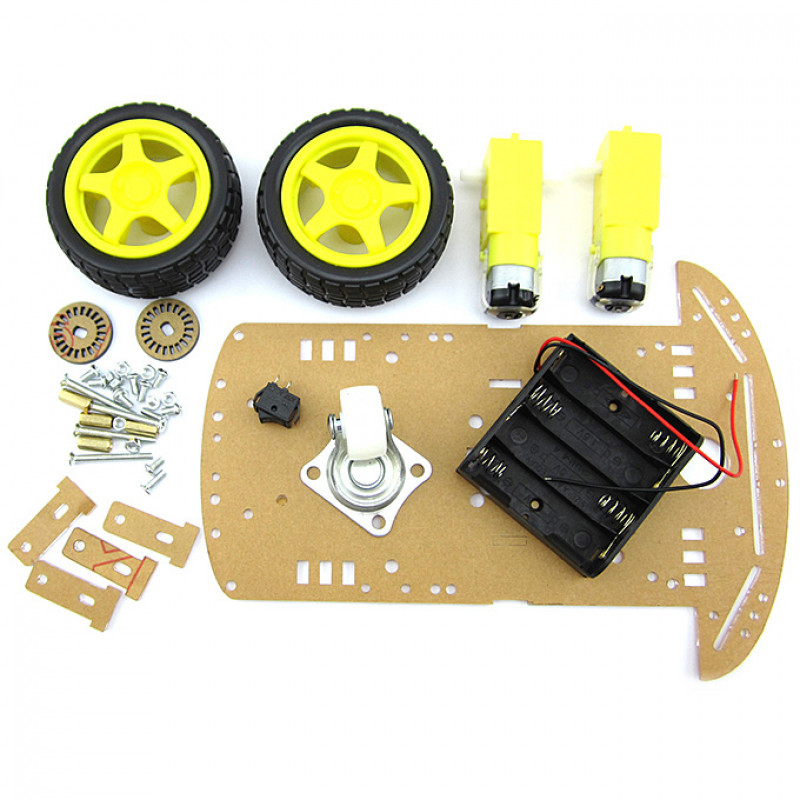
- Chassis frame: A sturdy base to mount all other components.
- Two DC motors: Provide the driving force for the wheels.
- Two wheels: Attach to the motors to enable movement.
- Caster wheel: A free-rotating wheel that provides balance and support.
- Battery holder: Powers the motors and other electronics.
- Motor mounts and brackets: Secure the motors to the chassis.
- Screws, nuts, and bolts: All the necessary hardware for assembly.
- Wiring and Connectors: For connecting the motors to the power source and control board.
Assembling the 2-Wheel Robot Chassis Kit
Assembling the 2-wheel robot chassis kit is straightforward and can be completed with basic tools. Follow these steps to build your robot chassis:
Step 1: Attach the Motors to the Chassis
- Position the motors: Place the DC motors on the designated slots on the chassis frame.
- Secure the motors: Use the motor mounts and brackets to attach the motors to the chassis. Ensure they are tightly secured using screws, nuts, and bolts.
Step 2: Attach the Wheels to the Motors
- Mount the wheels: Push the wheels onto the motor shafts.
- Secure the wheels: Tighten any set screws or clips to ensure the wheels are firmly attached to the motor shafts.
Step 3: Attach the Caster Wheel
- Position the caster wheel: Place the caster wheel at the opposite end of the chassis frame from the motors.
- Secure the caster wheel: Use screws and bolts to attach the caster wheel to the chassis, ensuring it can rotate freely for balance.
Step 4: Install the Battery Holder
- Position the battery holder: Place the battery holder on the chassis frame in a location that balances the weight distribution.
- Secure the battery holder: Use screws and bolts to attach the battery holder to the chassis.
Step 5: Connect the Wiring
- Prepare the wires: Cut the wires to appropriate lengths to connect the motors to the power source and control board.
- Connect the motors: Solder or use connectors to attach the motor wires to the control board.
- Connect the battery holder: Attach the battery holder wires to the control board and motors.
Step 6: Test Your Assembly
- Insert batteries: Place the batteries into the battery holder.
- Power on: Turn on the power and test the motors to ensure they are working correctly and that the wheels are moving as expected.
Programming and Control
Once your 2-wheel robot chassis is assembled, you can move on to programming and controlling it. You can start with the following:
- Microcontroller: Use an Arduino or Raspberry Pi to control the motors and add sensors for autonomous navigation.
- Motor driver: Incorporate a motor driver to control the speed and direction of the motors.
- Remote control: Implement remote control using Bluetooth, Wi-Fi, or an infrared remote.
Advantages
- Ease of control: The straightforward design simplifies programming and control, making it ideal for beginners.
- Cost-effective: Generally, 2-wheel chassis kits are more affordable, making them perfect for budget-conscious projects.
- Versatile applications: Suitable for line-following robots, maze solvers, and simple autonomous vehicles.
Applications and Projects
With your 2-wheel robot chassis ready to go, you can explore a variety of projects:
- Line-Following Robot: Add infrared sensors to create a robot that follows a line on the ground.
- Obstacle Avoidance Robot: Use ultrasonic sensors to build a robot that navigates around obstacles.
- Bluetooth-Controlled Robot: Implement a Bluetooth module to control your robot using a smartphone app.
- Voice-Controlled Robot: Use a microphone and voice recognition software to control the robot with voice commands.
- Maze-Solving Robot: Program the robot to navigate through a maze using algorithms like wall-following or pathfinding.
- Light-Seeking Robot: Use light sensors to make the robot move towards a light source.
- Gesture-Controlled Robot: Implement an accelerometer or gyroscope to control the robot with hand gestures.
- Color-Detecting Robot: Use a color sensor to make the robot respond to different colors on the ground.
- Wireless Camera Robot: Attach a wireless camera and control the robot while viewing the live feed on a smartphone or computer.
- Autonomous Delivery Robot: Program the robot to deliver small items from one location to another.
4-Wheel Robot Chassis

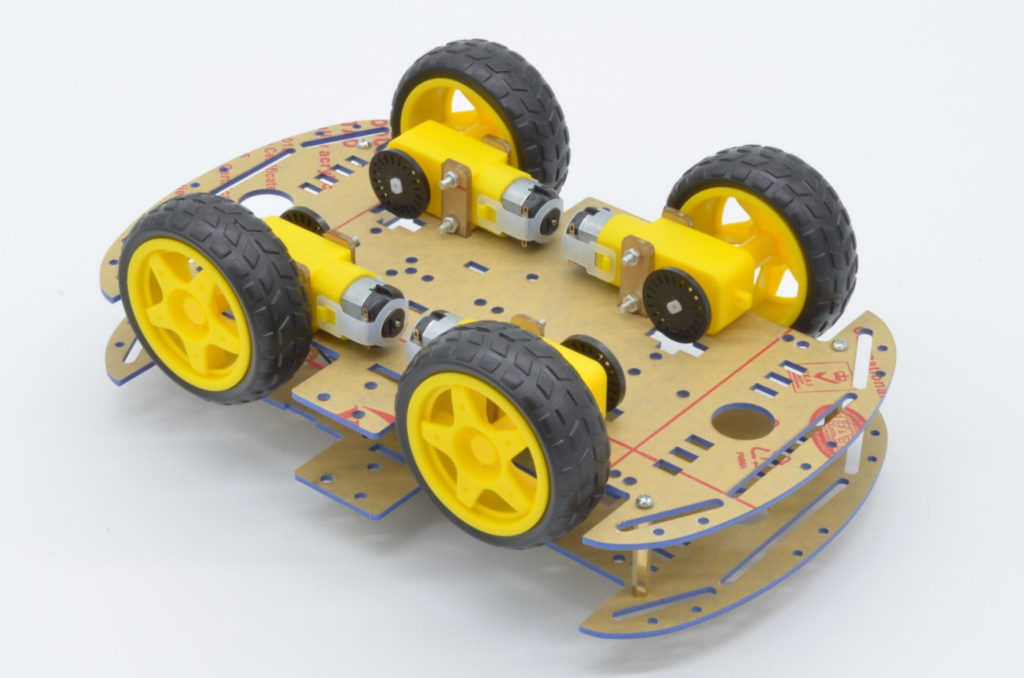
Features
- Robust Design: The 4-wheel chassis offers a sturdy and stable platform, capable of handling more weight and tougher terrains.
- Enhanced Stability: With four points of contact, this chassis ensures greater stability and balance, making it ideal for outdoor use.
- Powerful Motors: Comes with high-torque motors, suitable for carrying additional sensors and payloads.
- Flexible Mounting: Plenty of space and mounting options for additional components like sensors, cameras, and microcontrollers.
Components
Our 4-wheel robot chassis kit includes everything you need to build a strong and reliable robot base. Here are the main components included in the kit:
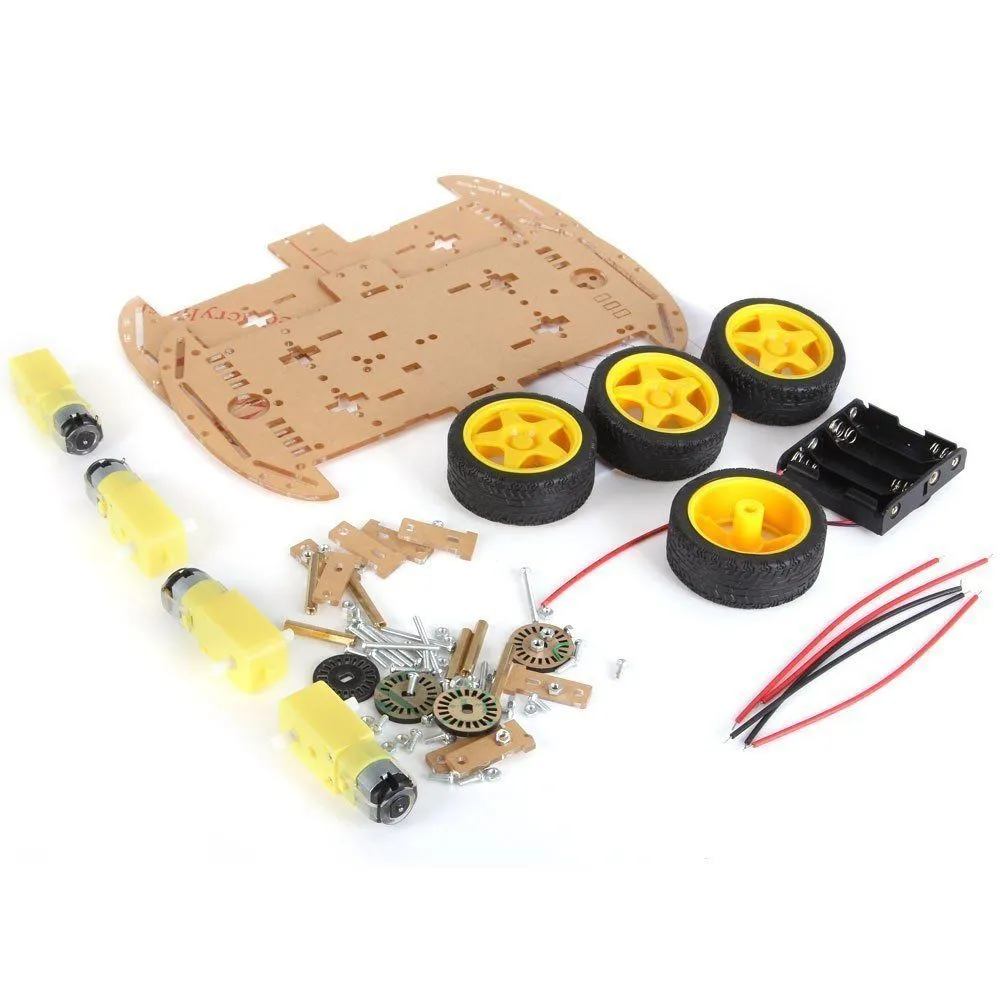
- Chassis Frames: A durable and spacious platform to mount all components.
- Four DC Motors: Provide powerful and balanced driving force.
- Four Wheels: Attach to the motors for smooth movement.
- Battery Holder: Supplies power to the motors and electronics.
- Motor Mounts and Brackets: Secure the motors to the chassis frame.
- Screws, Nuts, and Bolts: All the necessary hardware for assembly.
- Wiring and Connectors: For connecting the motors to the power source and control board.
Assembling the 4-Wheel Robot Chassis Kit
Assembling the 4-wheel robot chassis kit is just as straightforward as assembling the 2-wheel kit. Follow these steps to build your robot chassis:
Step 1: Attach the Motors to the Chassis
- Position the Motors: Place each DC motor in its designated slot on the chassis frame.
- Secure the Motors: Use the motor mounts and brackets to attach the motors to the chassis. Ensure they are tightly secured using screws, nuts, and bolts.
Step 2: Attach the Wheels to the Motors
- Mount the Wheels: Push the wheels onto the motor shafts.
- Secure the Wheels: Tighten any set screws or clips to ensure the wheels are firmly attached to the motor shafts.
Step 3: Install the Battery Holder
- Position the Battery Holder: Place the battery holder on the chassis frame in a balanced location.
- Secure the Battery Holder: Use screws and bolts to attach the battery holder to the chassis.
Step 4: Connect the Wiring
- Prepare the Wires: Cut the wires to appropriate lengths to connect the motors to the power source and control board.
- Connect the Motors: Solder or use connectors to attach the motor wires to the control board.
- Connect the Battery Holder: Attach the battery holder wires to the control board and motors.
Step 5: Test Your Assembly
- Insert Batteries: Place the batteries into the battery holder.
- Power On: Turn on the power and test the motors to ensure they are working correctly and that the wheels are moving as expected.
Programming and Control
The same programming and controls used for the 2-wheel chassis can be used for the 4-wheel chassis.
Advantages
- Increased Stability: The four-wheel design prevents tipping and offers a smoother ride over uneven surfaces.
- Higher Load Capacity: Capable of supporting heavier payloads, making it ideal for complex projects.
- Improved Traction: Better traction on various surfaces, including rough and uneven terrain.
Applications and Projects
Explore a variety of projects with your 4-wheel robot chassis:
- Advanced Navigation Robot: Equip your robot with GPS and sensors for autonomous outdoor navigation.
- Surveillance Robot: Add cameras and wireless communication for a mobile surveillance system.
- Heavy-Duty Transport Robot: Design a robot capable of carrying and transporting heavier loads.
- All-Terrain Rover: Design a robot capable of navigating rough and uneven outdoor terrain using robust wheels and suspension.
- Delivery Robot: Build a robot that can deliver packages or groceries within a neighborhood, an office, or campus.
- Smart Home Integration Robot: Create a robot that can control smart home devices, acting as a mobile hub.
- Security Patrol Robot: Implement sensors and cameras to create a robot that patrols and secures an area.
- Multi-Tool Robot: Develop a robot with interchangeable tools for different tasks, such as drilling, cutting, or welding.
Shop now
Visit our store today to explore these chassis kits and more! Get started on building your next robot and take your projects to the next level.
We look forward to seeing the amazing robots you create with our chassis kits. Until next time, happy building!


